

Local Caching
Overview: Configure a Solsta Caching Server (Docker)
Solsta normally delivers builds through a cloud-hosted bucket backed by a global CDN. This works well for distributed teams but can strain bandwidth inside a studio when many users repeatedly download identical data from the internet.
A local caching server solves that problem. By routing internal Solsta traffic to a studio-hosted cache, the first download populates the cache and all subsequent downloads are served at LAN speed—reducing bandwidth load and improving performance for the entire studio.
This guide walks through setting up a Solsta caching server using Docker.
Contents:
- Caching Server Network Diagram
- Requirements
- Download the Solsta Cache Server
- Notes for Route53 Users
- Configuration (from the Repository Readme)
- Solsta Routing Setup
- Validating Cache Server Operation
Caching Server Network Diagram:
Only Solsta content requests are routed through the caching server. Authentication and user-specific calls still go directly to Solsta.
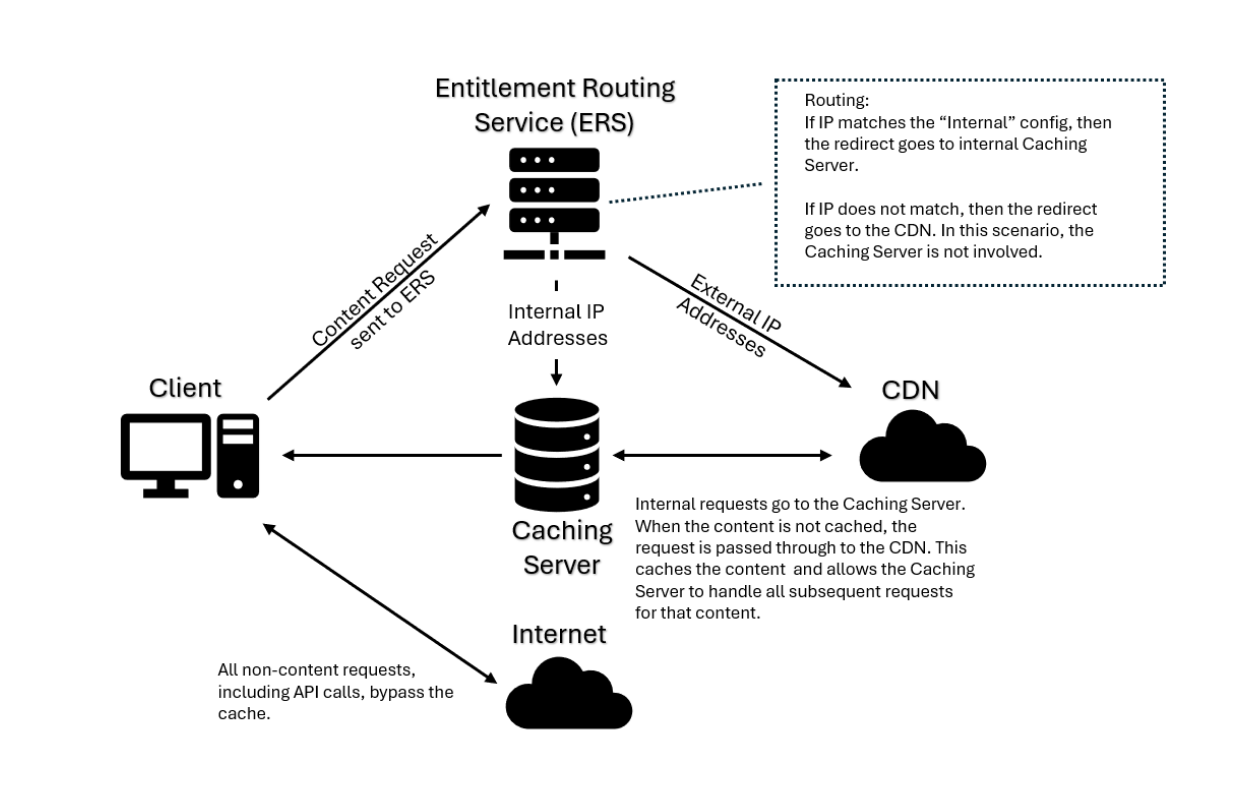
Workflow example:
- User 1 downloads a new build → request goes to the caching server → cache server forwards to CDN.
- CDN responds → cache server stores content on local disk.
- User 2+ download the same build → served instantly from the cache.
Important: caching begins as soon as the content is fetched—User 1 does not need to finish the download.
Requirements:
- Docker - tested on Ubuntu 24.04.1
- Solsta Cache Server repository (see below)
- Internal DNS subdomain with a 60-second TTL pointing to your internal server
Example:caching.mystudio.com → 192.168.1.200 - HTTPS certificates - Acquired via Certbot using a DNS plugin (recommended for internal IPs)
Hardware Sizing & Scaling Considerations
Solsta cache server performance is primarily constrained by storage I/O, followed by network throughput, then RAM and CPU. Hardware requirements scale based on build size and concurrent studio users.
If you already have a machine available, you can deploy the cache server and monitor CPU, disk I/O, and network utilization under normal studio load. Sustained spikes to full utilization indicate the server is undersized and should be upgraded.
Baseline Hardware Specification
This configuration supports most mid-sized studios and should be treated as a starting point:
- OS: Ubuntu 24.04.1 (Docker)
- CPU: 8+ cores
(required to handle high-speed SSL/TLS termination and concurrent connections) - RAM: 16–32 GB
(improves Linux filesystem cache efficiency) - Storage: 4–8 TB+ NVMe SSD
(critical for LAN-speed delivery of cached content) - Network: 10 Gbps Ethernet recommended
Critical Scaling Factors
- Storage Performance
Cached data is stored as.solidpiecefiles. To serve multiple users simultaneously at LAN speeds, NVMe SSD storage is strongly recommended. HDDs will introduce I/O wait and become a bottleneck under load. - Disk Capacity & TTL
Ensure available disk space can accommodate the total size of active builds you want cached.
Example:7 daily builds × 300 GB × 2-day TTL = ~4.2 TB required - Disk TTL (Time To Live) and maximum cache size are configurable and should be tuned to automatically evict stale data.
- Networking
If your studio has a 10 Gbps internal backbone, the cache server should be equipped with a 10 Gbps NIC. This allows the server to saturate multiple workstations simultaneously without becoming a choke point.
Download the Solsta Cache Server:
The repository contains the Docker image and setup instructions:
Download:https://releases.snxd.com/cache-solsta-dev-20251022.zip
The container uses nginx for caching and integrates with Solsta’s entitlement services. Because it runs on an internal IP, SSL renewal is performed via the Certbot DNS plugin rather than HTTP challenge.
Using the Route53 DNS Plugin:
If you use the Route53 plugin to set up certbot.credentials, you can create a dedicated AWS user account and policy that Certbot can use to verify the domain.
Example Policy from Certbot’s Route53 DNS Plugin
Follow the Readme:
The README.md within the repository walks you through configuring options in your caching server, such as:
- Directory where files are stored
- Disk TTL
- Max cache size
- Certbot settings
- Internal domain and external URL to reroute
The readme also contains instructions for creating, starting, stopping and uninstalling the cache server.
UPSTREAM_URL
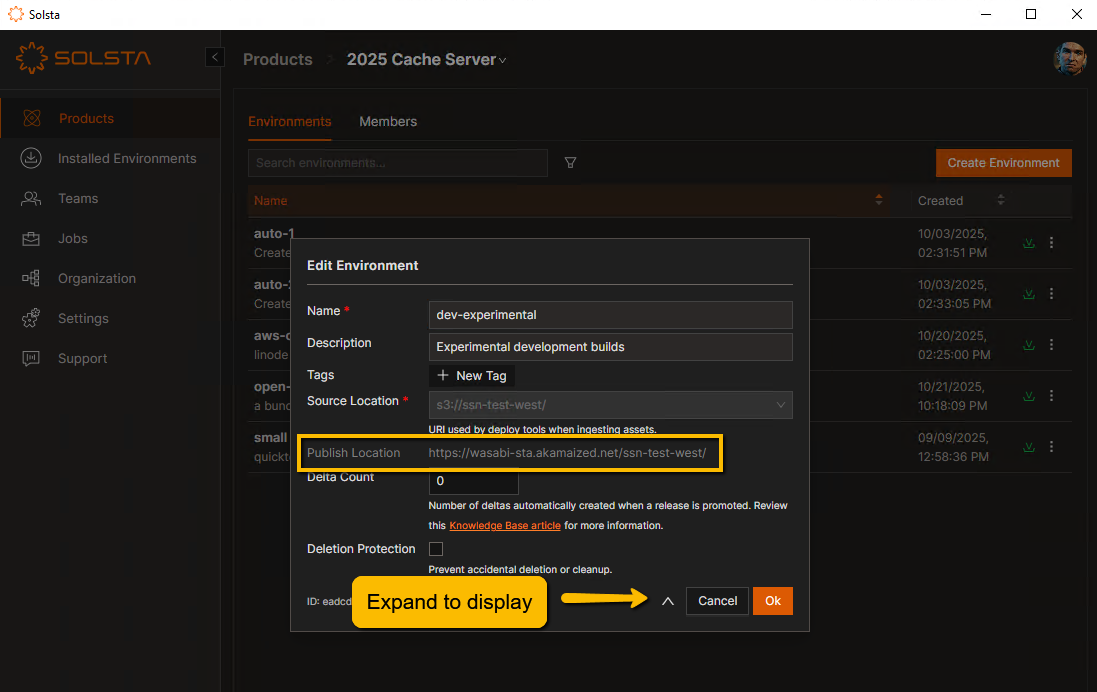
To configure your server to cache your Solsta deployment data, you will need your Solsta delivery URL or Publish Location hostname set as the UPSTREAM_URL value in the .env file. The publish location URL can be retrieved using the Solsta Desktop Application. As an admin user, navigate to any environment and click Edit from the context menu, then click on the expand arrow. This will reveal the Publish Location so you can copy the hostname. In the example below, only the hostname is required for the UPSTREAM_URL value: https://wasabi-sta.akamaized.net
Note: After you start the server, run a quick test on a browser by requesting test.txt from your domain via an HTTPS URL.
Example: https://caching.snxd.com/test.txt

Note: test.txt is a built-in test in the nginx webserver configuration to confirm an HTTP response. It is not an actual file in your caching server storage.
Solsta Routing Configuration
Once you have set up your caching server, you will need to route your desired traffic to it within the Solsta Desktop Application.
- Log in as Solsta Organization Admin
- Hover over the Organization menu on the navigation panel, then click on Cache Redirects
- Click on the Create Cache Redirect button on the top right
- From the Create Cache Redirect modal:
- Hostname: Enter the DNS entry associated with your caching server. Example: caching.snxd.com
- Source IP: The block of external (outgoing) IPs to be routed to your local cache server using CIDR network notation. Example: 192.34.67.0/26. Note that you can create multiple entries to the same caching server.
- Click Ok

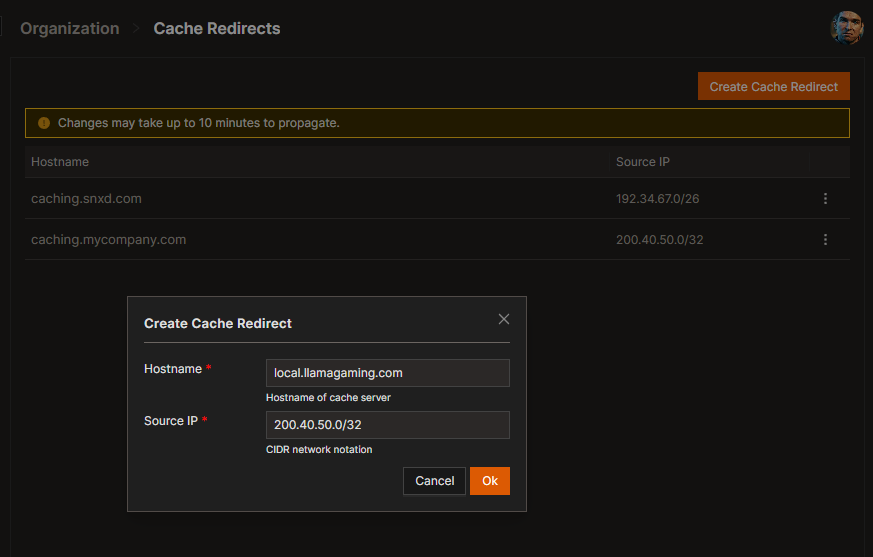
From this point it can take up to 10 minutes for the traffic to be routed to your caching server. Requests coming from other IPs will continue to go directly to the CDN as usual.
To disable a redirect rule, simply delete. As of Solsta 2.0.28 existing rules cannot be edited. To make any changes to the IP block or hostname, delete the existing rule and create a new one.
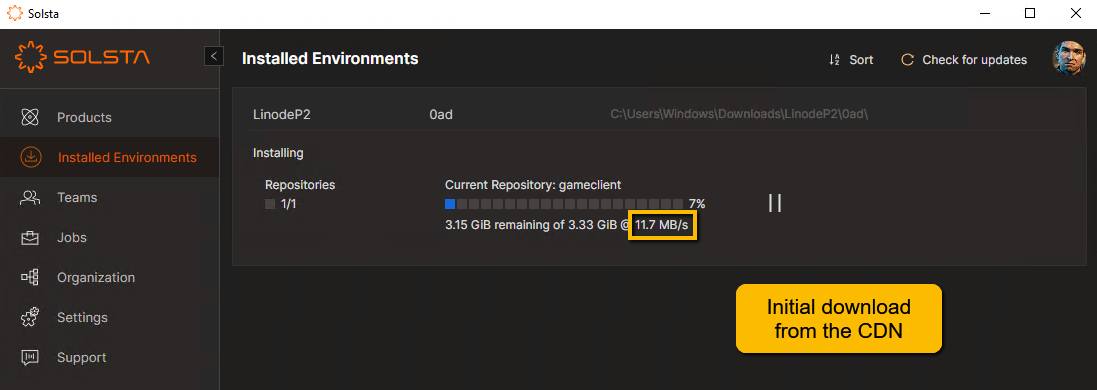
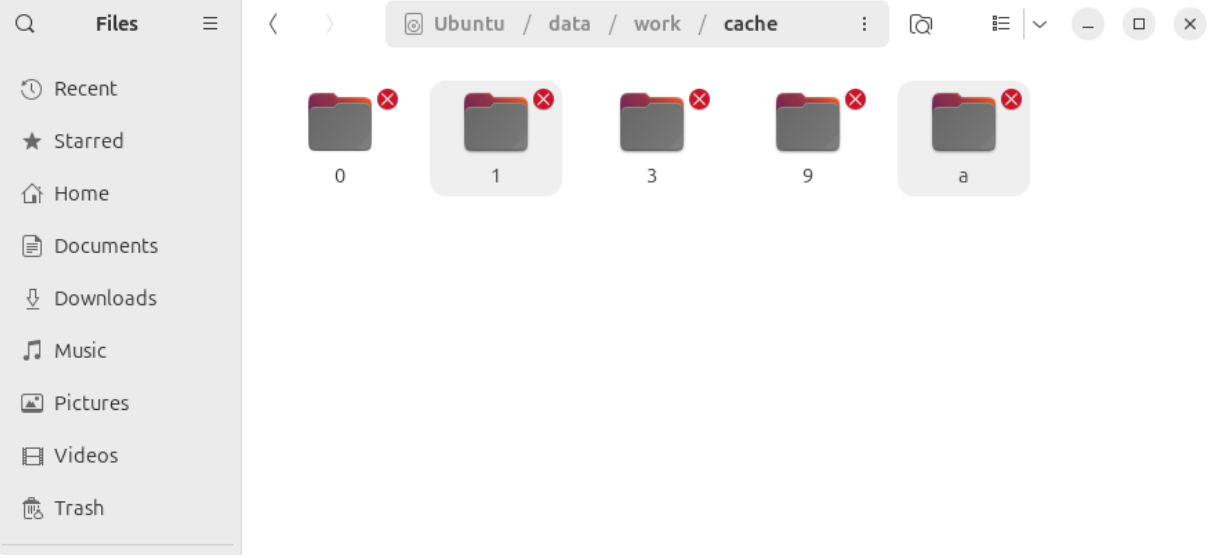
Confirm Cache Server Functionality:
After the Solsta support team confirms we’re re-routing your studio traffic to your cache server, simply install an environment using the Solsta Desktop Application from one of the studio machines. If everything is set up correctly, you should see the storage disk on your caching server saving Solsta deployment data (in the form of .solidpiece files in many sub-folders).
You can also view the nginx access/error logs in nginx/logs directory. In the access.log file, entries that were served from the caching server will end with "upstream_site" - -.
Example:
If the file was passed through the caching server and retrieved from the CDN, the entry will end with "upstream_site" EDGEIP.
Example:
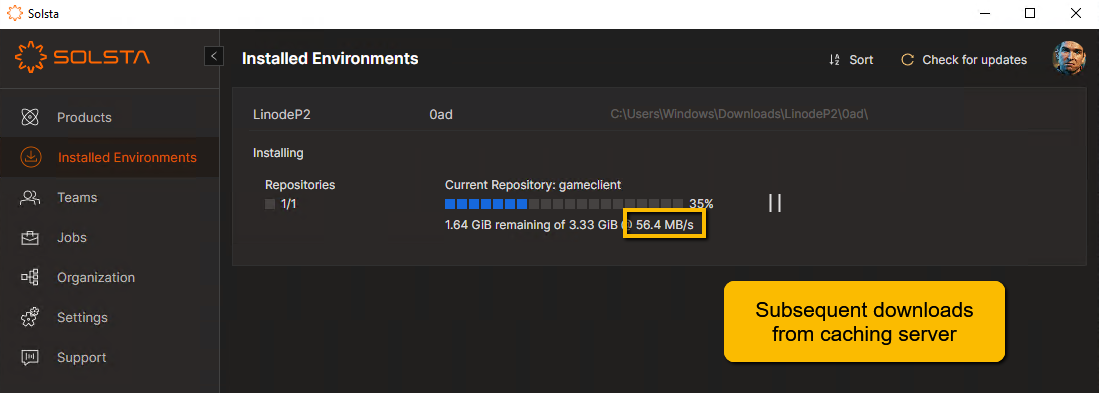
On the Solsta Desktop Application, you can uninstall and re-install the same environment. The speeds should be as fast as your internal network (and local disk) will allow.
In addition to the download speeds on the UI, the Solsta debug log - once you exit the client after a download or update - will contain the domains the data was downloaded from.
Example from the bottom of the debug log (where caching.snxd.com is the cache server subdomain)