

Solsta CLI
Use the Solsta Command Line Interface (CLI)
Overview:
The Solsta Command Line Interface (CLI) allows you to use Solsta functionality - such as install, update, launch, etc - from a terminal or command prompt. That’s right: no GUI or clicking required. Let the automation begin!
As of June 2025, the Solsta CLI has been tested on:
- Windows 10+
- macOS 12+ (arm and x64 architectures)
- Ubuntu 22.04.3 - 24.04
Execute Permissions:
After downloading the Solsta CLI client for macOS or Ubuntu, make sure the file has execute permissions. You can use the argument below in the terminal to give the file execute permissions.
chmod +x /path/to/solsta_cli
New in Version 7.2.149
Version 7.2.149 of the CLI client included the following changes
- Support for optional repositories
- Support for installing specific versions or snapshots (not just the latest)
- Integration with the orchestration service
See the specific sections below for usage information on the new functionality.
Known Issues
- Terminal error does not release session slot from orchestration service. This causes a retry of the same download on the same machine to be delayed for 10 minutes.
Login:
As of version 7.2.77, the Solsta CLI provides two methods for authenticating:
- User Credentials - opens a login prompt in a browser just like the Solsta Desktop Application (GUI)
- Machine-to-machine (M2M) Credentials - These credentials are meant for unmanned machines or devices that do not allow login via a browser. See Create and Manage Machine Credentials for details.
User Authentication:
Use the arguments below to log in as an individual user:
solsta_cli login prompt
This will open a browser window where you enter your organization name and user credentials. Once you login, the Solsta CLI creates an entry on your device’s credentials manager. A refresh token is used for subsequent sessions. The token will expire only if it is not used and refreshed for 30 days.

Tip: Stay Active to Stay Logged In
If the Solsta CLI is used on a machine at least once every 30 days, the token will be perpetually refreshed and the user will not be required to login before a session. Users can create a scheduled task for the Solsta CLI to read the location installations (for example) to keep that token active.
M2M Authentication:
Use the commands below to generate an access token for the instance of Solsta CLI on your machine. You will need the client_id and client_secret values for the machine credentials generated from the Solsta Desktop Applicaiton. See Create and Manage Machine Credentials for details.
solsta_cli login client_credentials --client_id=SUPERSECRETID --client_secret=EVENMORESECRETIVEThis will create a set of credentials that can be viewed in your device’s credentials manager.

These credentials expire after 24 hours.
Logout:
Use the argument below to logout
solsta_cli logout
This will clear any and all local tokens and require a login before the next session.
Object Read - What’s available for install?
Typically you’ll be installing by product and environment names. You can use the read option for products and environments to get a list of the products and environments available to you.
Product Read Command:
solsta_cli product read
Product Read Output:
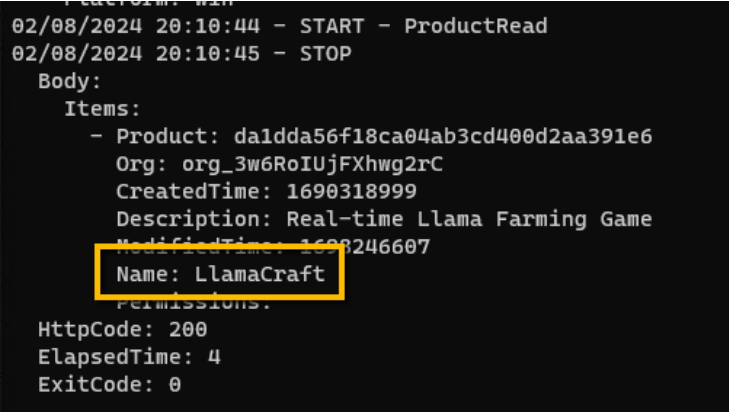
Now that you’ve got a product name, you can use it to get the names of the Environments within that product.
Tip: Names are Case Sensitive
Name values are case sensitive, so --product_name=llamacraft will NOT work for a product named LlamaCraft.
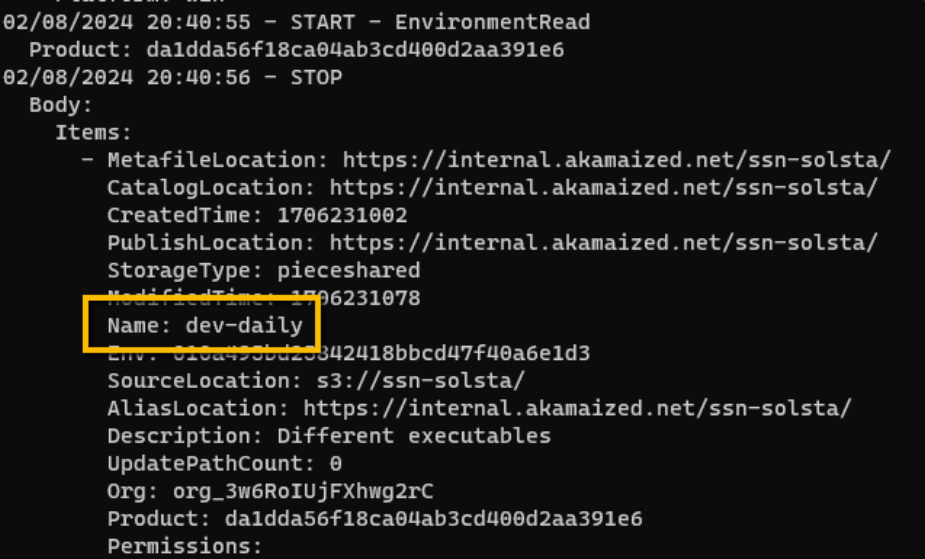
Environment Read Command:
solsta_cli env read --product_name=LlamaCraft
Environment Read Output:
Install:
Once you retrieve the product and environment names, you can use them as parameters for the install option. During an install, a value is required for the location parameter to indicate the directory where the environment should be installed.
Basic Install Examples:
Windows
solsta_cli local install --product_name=LlamaCraft --env_name=dev-daily --location=c:/gamebuilds/LlamaCraft/dev-daily/
macOS
solsta_cli local install --product_name=LlamaCraft --env_name=dev-daily --location=/Users/applegate/gamebuilds/LlamaCraft/dev-daily/
Ubuntu
solsta_cli local install --product_name=LlamaCraft --env_name=dev-daily --location=/home/penguin/gamebuilds/LlamaCraft/dev-daily/
Installation Notes:
- An environment can be installed to multiple unique locations
- Two distinct environments can be installed to the same location, however, to prevent file collisions and issues during updates, the repositories within those environments:
- Must not manage the same set of files
- Must not share the same name (e.g. gameclient)
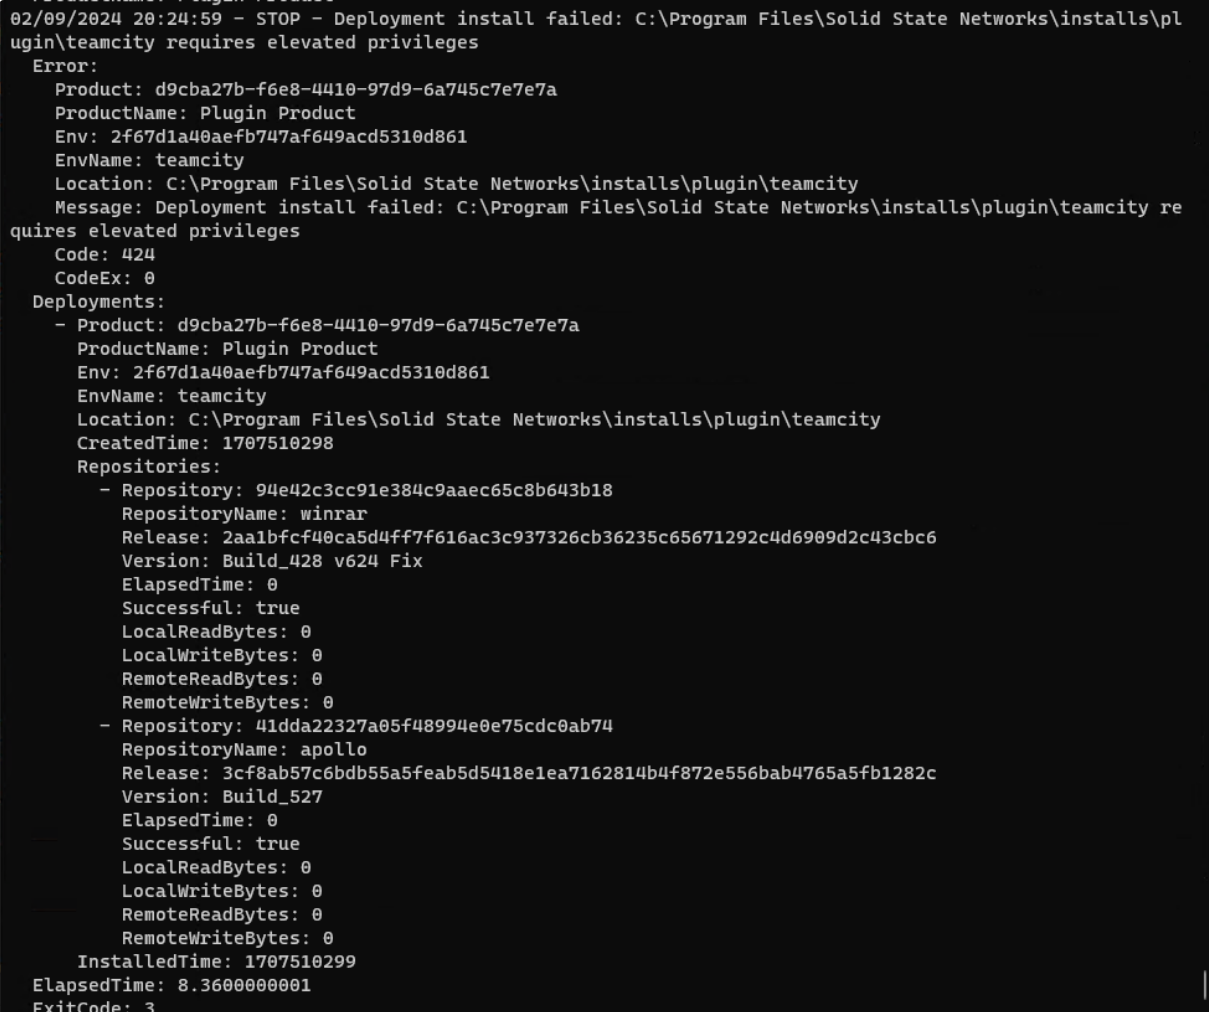
Warning- Elevation Required to Install to Protected Directories
When installing a protected directory - e.g. C:\Program Files\ - the Solsta CLI process must be running with elevated rights (Administrative User privileges). A non-elevated instance of the Solsta CLI process attempting to install/update on a protected directory will result in an OS error with process exit code 3.
Install Specific Release Versions
If you don’t want to install the latest releases assigned to an environment, there are various options for installing previous releases:
- Install previous versions from a snapshot - please see Install a Specific Version of an Environment for more information about snapshots.
- Use a snapshot as a base for the install, then specify a specific version for a repository
- Use a specific version for one repository out of several in the environment. In this scenario, the latest version will be used for other required repositories in the environment if they are not named in the session’s command string.
- Use a specific version for all repositories in the environment
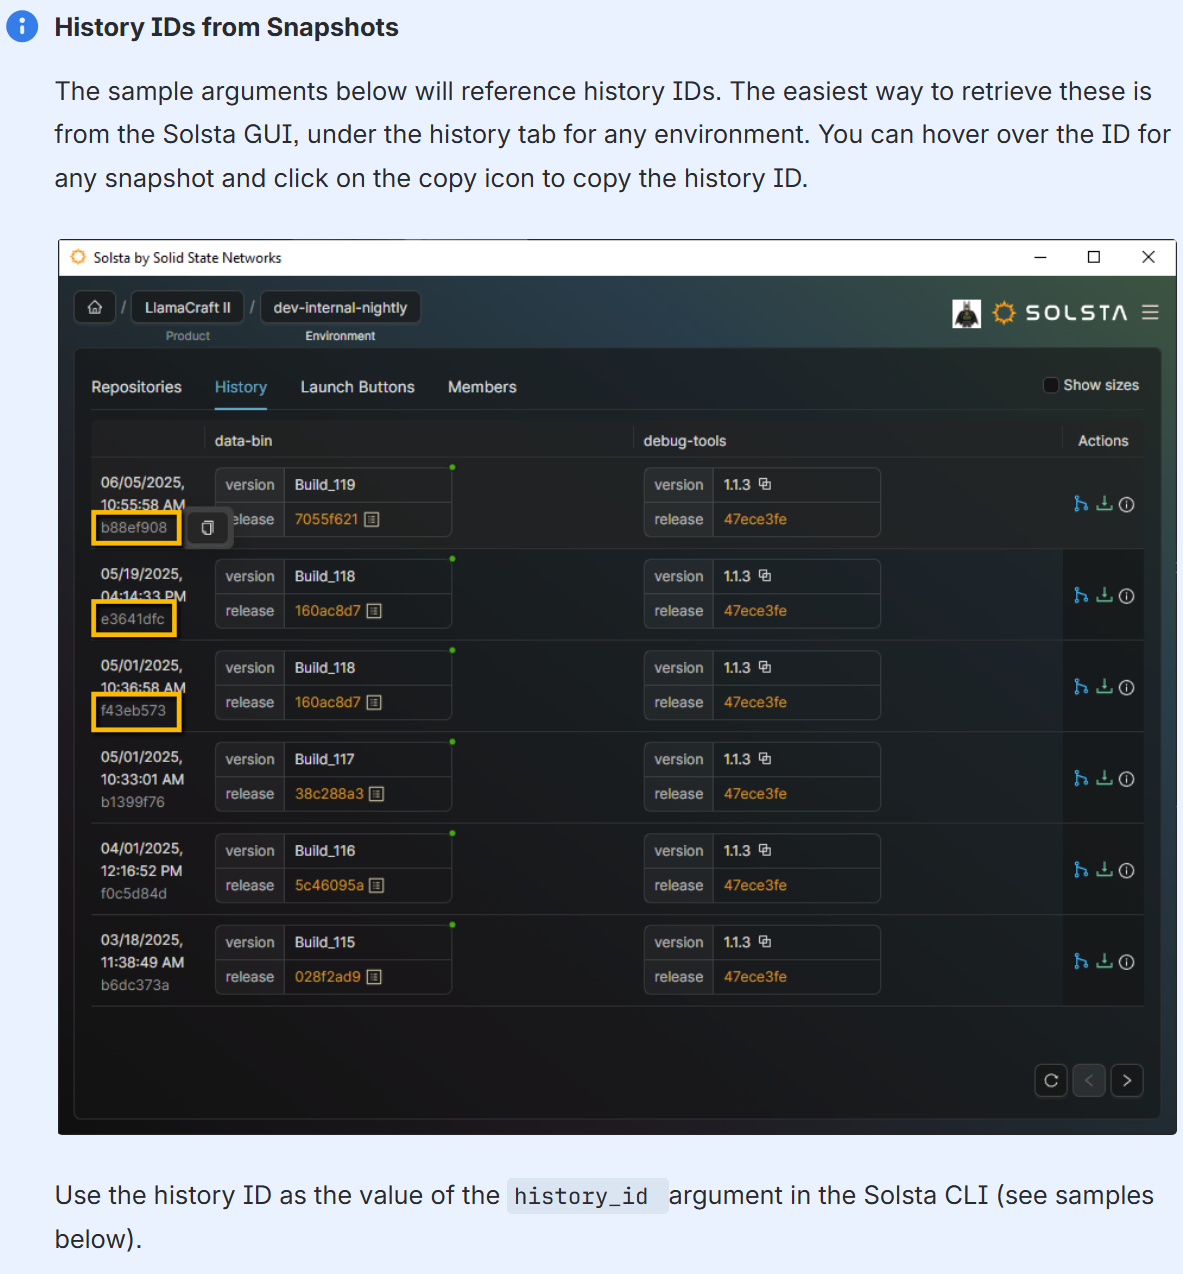
Install using a snapshot
solsta_cli local install --product_name="LlamaCraft" --env_name=dev-daily --history_id=b55b42a6-481d-4c92-b3d6-ad1cb1fc68f8 --location=c:/ssn/solsta/cli/installs/llamacraft/dev-daily/ --debugfileInstall using snapshot as base, plus a specific version
solsta_cli local install --product_name="LlamaCraft" --env_name=dev-daily --history_id=b55b42a6-481d-4c92-b3d6-ad1cb1fc68f8 --repository_name=data --release_version=Build_7 --location=c:/ssn/solsta/cli/installs/llamacraft/dev-daily/ --debugfileInstall using a specific version of a single repository
solsta_cli local install --product_name="Plugin Product" --env_name=jenkins-win-auto --repository_name=apollo --release_version=Build_10 --location=c:/ssn/solsta/cli/installs/plugin/jenkins-wa/ --debugfile- Installs apollo repository at version Build_10
- Installs any other required repositories at the latest version specified in the environment
Install using a specific version for multiple repositories
solsta_cli local install --product_name="Plugin Product" --env_name=jenkins-win-auto --repository_name=apollo --release_version=Build_10 --repository_name=data --release_version=Build_25 --location=c:/ssn/solsta/cli/installs/plugin/jenkins-wa1/ --debugfile
Install Optional Repositories
See Create a Repository on the Solsta Desktop Application for more information on optional and required repositories.
When you install an environment using the CLI using only the product and environment information, only the required repositories are included in the installation. To include optional repositories in the installation, you must specify both the name of the optional repositories and a release version (or use “latest” - see below for details).
If you specify an optional repository without a corresponding release, the command will result in an error:
STOP - No release found for repository
  Error:
    Repository: db30cabf4becec4bbd809d35495d84a1
    Message: No release found for repository
    Code: 400
    CodeEx: 0
  ElapsedTime: 1.502674
  ExitCode: 2
Install a single optional repository:
The arguments below will install all required repositories in the environment (using the currently assigned version), as well as the latest version for the named optional “dev-tools” repository.
solsta_cli local install --product_name="Plugin Product" --env_name=jenkins-win-auto --repository_name=dev-tools --release_id=latest --location=c:/ssn/solsta/cli/installs/plugin/jenkins-wa/ --debugfile
Install multiple optional repositories
The arguments below will install all the required repositories in the environment, as well as the specified versions for each of the named optional repositories.
solsta_cli local install --product_name="Plugin Product" --env_name=jenkins-win-auto --repository_name=dev-tools --release_version=6.1.33 --repository_name=qa-tools --release_version=10.1 --location=c:/ssn/solsta/cli/installs/plugin/jenkins-wa/ --debugfile
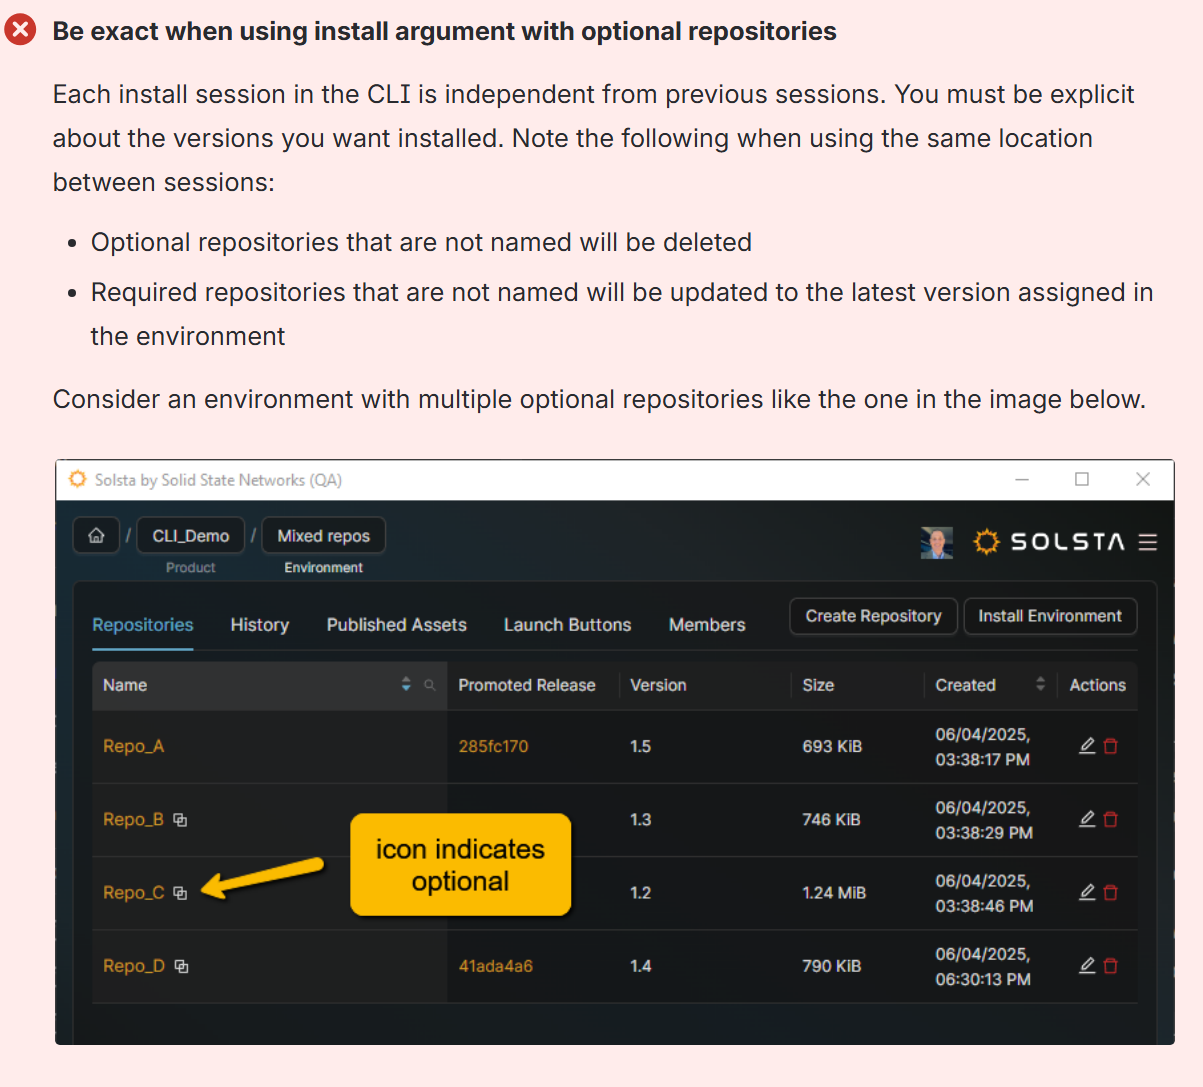
Session 1: Required and optional repos installed
solsta_cli local install --product_name=CLI_Demo --env_name="Mixed repos" --location=C:/ssn/solsta/cli/install/cli_demo/mixed/ --repository_name=Repo_A --release_version=1.1 --repository_name=Repo_B --release_id=latest --debugfile
- installs required Repo_A at previous version 1.1
- installs required Repo_B at the latest version
Session 2: Optional Repo_C is added
solsta_cli local install --product_name=CLI_Demo --env_name="Mixed repos" --location=C:/ssn/solsta/cli/install/cli_demo/mixed/ --repository_name=Repo_C --release_id=latest --debugfile
- updates required Repo_A to the latest version 1.5 because it was not included in the argument string
- removes optional Repo_B because it was not included in the command string
- installs optional Repo _C at the latest version
Note: Install argument is used when rolling back releases, this also applies when rolling back releases. See below for more information. Once an optional repository is added to an installation location, updating that location in subsequent sessions results in both required and optional repositories being updated. See the Update section below for more details.
Local Read - What is already installed?
For the rest of the Solsta CLI functionality - update, launch, repair and uninstall - you will use information from environments you’ve already installed. The local read option allows you to retrieve a list and details of your local installations.
Local Read Command
solsta_cli local read
Local Read Output
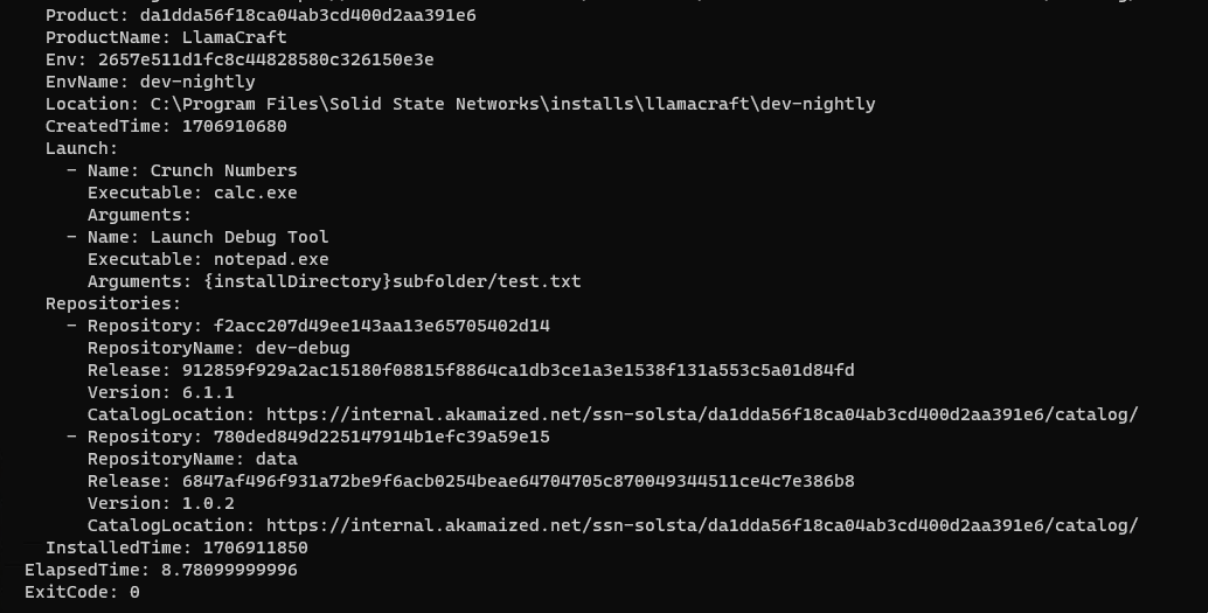
Note: This output contains names, IDs, location and launch entries for each installed environment.
Update:
There are several options for updating the installed environments on a machine.
- Update all - updates all environments in all locations
- Update by name - updates all environments matching the specified name, regardless of location
- Update by location - updates all environments installed in the specified location
- Update by name and location - updates the named environment at the specified location
Update Examples:
solsta_cli local update --all
solsta_cli local update --product_name=LlamaCraft --env_name=dev-nightly
solsta_cli local update --location=c:/gamebuilds/LlamaCraft/dev-daily/
solsta_cli local update --product_name=LlamaCraft --env_name=dev-nightly --location=c:/gamebuilds/LlamaCraft/dev-daily/
Rollback or Roll Forward to Specific Versions:
The update argument is only used to update to the latest versions assigned to an environment. In order to update a repository to any other version, the install argument must be used in conjunction with the repository name and a release version.
As with installing specific versions, there are various options for rolling back or forward to other releases:
- Roll back to previous versions from a snapshot - please see Install a Specific Version of an Environment for more information about snapshots.
- Use a snapshot as a base for the rollback, then specify a specific version for a repository
- Use a specific version for one repository out of several in the environment. In this scenario, the latest version will be used for other required repositories in the environment if they are not named in the session’s command string.
- Use a specific version for all repositories in the environment
As when installing optional repositories, you should be exact with your commands so that all your repositories are updated to the version you intend.
Rollback a single repository
solsta_cli local install --product_name=LlamaCraft --env_name=dev-nightly --location=c:/ssn/solsta/cli/install/llamacraft/dev-nightly/ --repository_name=dev-debug --release_version=6.1.0 --debugfile
- Rolls back dev-debug repo to version 6.1.0
- Uninstalls any optional repositories because they are not named
- Updates any other required releases to latest because they are not named
Rollback multiple repositories
solsta_cli local install --product_name=LlamaCraft --env_name=dev-nightly --location=c:/ssn/solsta/cli/install/llamacraft/dev-nightly/ --repository_name=dev-debug --release_version=6.1.0 --repository_name=data --release_version=1.0.8 --debugfile
- Rolls back dev-debug repo to version 6.1.0
- Rolls back data repo to version 1.0.8
Rollback using a snapshot
solsta_cli local install --product_name="LlamaCraft" --env_name=dev-daily --history_id=b55b42a6-481d-4c92-b3d6-ad1cb1fc68f8 --location=c:/ssn/solsta/cli/installs/llamacraft/dev-daily/ --debugfile
- Rolls back any required repos to the versions specified in the snapshot
- Uninstalls any optional repositories because they are not named
Rollback using a snapshot as base, plus a named version
solsta_cli local install --product_name="LlamaCraft" --env_name=dev-daily --history_id=b55b42a6-481d-4c92-b3d6-ad1cb1fc68f8 --repository_name=data --release_version=Build_7 --location=c:/ssn/solsta/cli/installs/llamacraft/dev-daily/ --debugfile
- Rolls back data repo to version Build_7
- Rolls back any other required repos
Solsta Orchestration:
The Solsta Orchestration Service allows studios to view and manage concurrent installs or updates within a shared network to prevent bottleneck scenarios that constrain network performance. Please see Solsta Orchestration Service for more information.
The Solsta CLI allows you to add multiple download/sync operations - such as installs, updates, roll backs and repairs - to the queue and then process them in a separate session. This lets you schedule multiple downloads for a device via the orchestration queue.
You can also list items in the queue or delete them. See the samples below for usage information.
CLI Queued Operations
All download/sync operations will enter the queue via the orchestration service. If the device is part of a throttled network, a CLI session that executes an install or update will wait up to 4 hours for its turn in the queue. You can decrease that wait time by using the orch_throttle_timeout argument, where the wait time is specified in seconds. Example for 20 minutes:
--orch_throttle_timeout=1200
Add install or update to queue
Use the --queue argument to add an install, update or repair operation to the queue.
solsta_cli local install --product_name=LlamaCraft --env_name=dev-daily --location=C:/ssn/solsta/cli/install/llamacraft/dev-daily/ --queue
solsta_cli local update --product_name=LlamaCraft --env_name=dev-weekly --location=C:/ssn/solsta/cli/install/llamacraft/dev-weekly/ --queue
solsta_cli local repair --product_name=LlamaCraft --env_name=dev-nightly --location=C:/ssn/solsta/cli/install/llamacraft/dev-nightly/ --queue
solsta_cli local update --all --queue
List items in the queue for current machine
solsta_cli queue status
Notes
- This will list all the queued items for this device under the active credentials
- Use
solsta_cli queue helpto view options for sorting and filtering the queue output - You can view all the items in the queue for all devices in the organization using the Solsta Desktop Application. Please see Solsta Orchestration Service for more details.
Run or process items in the queue
After you have added items to the queue, use the arguments below to process them.
solsta_cli queue run
Queue notes
- Items will stay in the queue for 24 hours if they are not processed by a device
- A client will wait up to 4 hours on a throttled queue before exiting
- You can adjust the the amount a client waits on the service by using the
--orch_throttle_timeoutargument, where the amount of time the client waits is specified in seconds
Launch
The launch option requires the name of the launch entry for an installed environment as well as its location. As mentioned above, these can be retrieved using the local read commands. When there is only one environment installed on a specific location, you can use the parameters below to launch your file:
solsta_cli local launch --launch_name="Launch Debug Tool" --location=c:/gamebuilds/LlamaCraft/dev-daily/
If there are multiple environments installed in one location, you will need to specify the product and environment names as well.
solsta_cli local launch --launch_name="Launch Debug Tool" --location=c:/gamebuilds/LlamaCraft/dev-daily/ --product_name=LlamaCraft --env_name=dev-daily
Repair
As with updates, there are several options for repairing the installed environments on a machine.
- Repair all - repairs all environments in all locations
- Repair by name - repairs all environments matching the specified name, regardless of location
- Update by location - repairs all environments installed in the specified location
- Update by name and location - repairs the named environment at the specified location
Repair Examples
solsta_cli local repair --all
solsta_cli local repair --product_name=LlamaCraft --env_name=dev-nightly
solsta_cli local repair --location=c:/gamebuilds/LlamaCraft/dev-daily/
solsta_cli local repair --product_name=LlamaCraft --env_name=dev-nightly --location=c:/gamebuilds/LlamaCraft/dev-daily/
Uninstall
As with updates, there are several options for uninstalling the installed environments on a machine.
As with updates, there are several options for uninstalling the installed environments on a machine.
Delete Flag
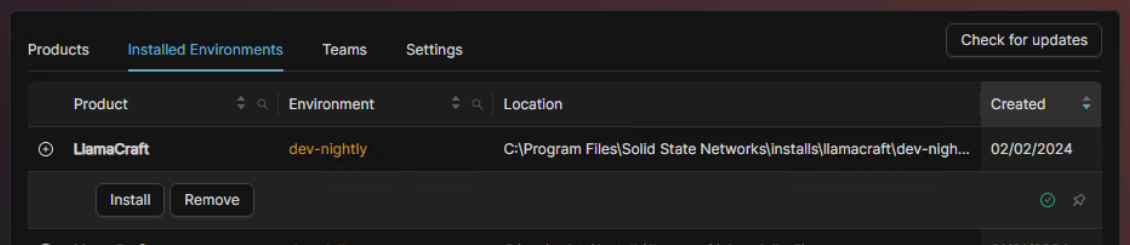
The --delete flag is an optional parameter that can be used with the uninstall option to remove the entry from the snapshots file. Using the delete flag means deleting entries included from the local read output for the Solsta CLI. Using uninstall without the --delete flag results in the environment remaining in the "Installed Environments" tab on the Solsta GUI (see image below).
- Uninstall all - uninstall all environments in all locations
- Uninstall by name - uninstall all environments matching the specified name, regardless of location
- Uninstall by location - uninstall all environments installed in the specified location
- Uninstall by name and location - uninstall the named environment at the specified location
Uninstall Examples
solsta_cli local uninstall --all --delete
solsta_cli local uninstall --product_name=LlamaCraft --env_name=dev-nightly --delete
solsta_cli local uninstall --location=c:/gamebuilds/LlamaCraft/dev-daily/
solsta_cli local uninstall --product_name=LlamaCraft --env_name=dev-nightly --location=c:/gamebuilds/LlamaCraft/dev-daily/
Help
All Solsta CLI commands output the supported options and parameters when the help option is used. Examples:
solsta_cli helpsolsta_cli product helpsolsta_cli local help
Output and Debugging Options
The parameters within this section apply to versions 7.2.80 and later of the Solsta CLI.
out
The --out parameter can be used for all sessions with the following options to control the type and format of the session output. The options can be combined and separated with commas.
- json: formats all output to JSON syntax
- minify: minify line breaks and spaces
Combine json and minify to generate single line JSON for output parsing. Example:
solsta_cli product read --out=json,minify
Sample output - JSON
{
  "timestamp": 1707510915,
  "type": "START",
  "message": "LocalInstall",
  "envName": "teamcity",
  "location": "C:\\ssn\\solsta\\installs\\plugin\\teamcity\\",
  "productName": "Plugin Product"
}
Sample output - Minified JSON
{"timestamp":1707510586,"type":"STOP","deployments":[{"product":"d9cba27b-f6e8-4410-97d9-6a745c7e7e7a","productName":"Plugin Product","env":"2f67d1a40aefb747af649acd5310d861","envName":"teamcity","location":"C:\\ssn\\solsta\\installs\\plugin\\teamcity\\","createdTime":1707510579,"repositories":[{"repository":"94e42c3cc91e384c9aaec65c8b643b18","repositoryName":"winrar","release":"2aa1bfcf40ca5d4ff7f616ac3c937326cb36235c65671292c4d6909d2c43cbc6","version":"Build_428 v624 Fix","elapsedTime":2.82799999998,"successful":true,"localReadBytes":3589048,"localWriteBytes":0,"remoteReadBytes":3408903,"remoteWriteBytes":3680},{"repository":"41dda22327a05f48994e0e75cdc0ab74","repositoryName":"apollo","release":"3cf8ab57c6bdb55a5feab5d5418e1ea7162814b4f872e556bab4765a5fb1282c","version":"Build_527","elapsedTime":2.92200000002,"successful":true,"localReadBytes":6186047,"localWriteBytes":0,"remoteReadBytes":6143214,"remoteWriteBytes":11040}],"installedTime":1707510586}],"elapsedTime":13.9539999999,"exitCode":0}status_interval
The --status_interval parameter can be used to determine how often the client prints to the standard output. By default, the client prints a progress status every 30 seconds. You can use the options below to change or disable these status outputs.
- 0: display immediately
- -1: disable interval
- integer: set the interval to number of seconds to , e.g. 120
Example:
solsta_cli local update --location=c:/gamebuilds/LlamaCraft/dev-daily/ --status_interval=60
Debug Parameters
The --debug and --debugfile parameters will write a solsta_cli.log file on your machine. These debug logs contain critical troubleshooting information required by the Solsta support team when opening a support ticket.
--debugfile writes the file to the user desktop. We recommend using this parameter when necessary for easy access the file.
--debug log locations by operating system:
- Windows: C:\Users\USERNAME\AppData\LocalLow\Solid State Networks\Solsta
- macOS: /Users/USERNAME/Library/Logs/Solsta
- Ubuntu: /home/USERNAME/.local/share/Solid State Networks/Solsta
Example:
solsta_cli local update --location=c:/gamebuilds/LlamaCraft/dev-daily/ --debugfile
Exit Codes
All sessions will use the exit codes below to indicate the outcome:
- 0: Success
- 1: Help displayed
- 2: Error (Error information should be provided in "error" section)
- 3: Elevation required
The --expected parameter can be used to suppress expected error codes and change the exit code from 2 to 0 for the session. It accepts a single value or a comma separated list of values. See below for an example.
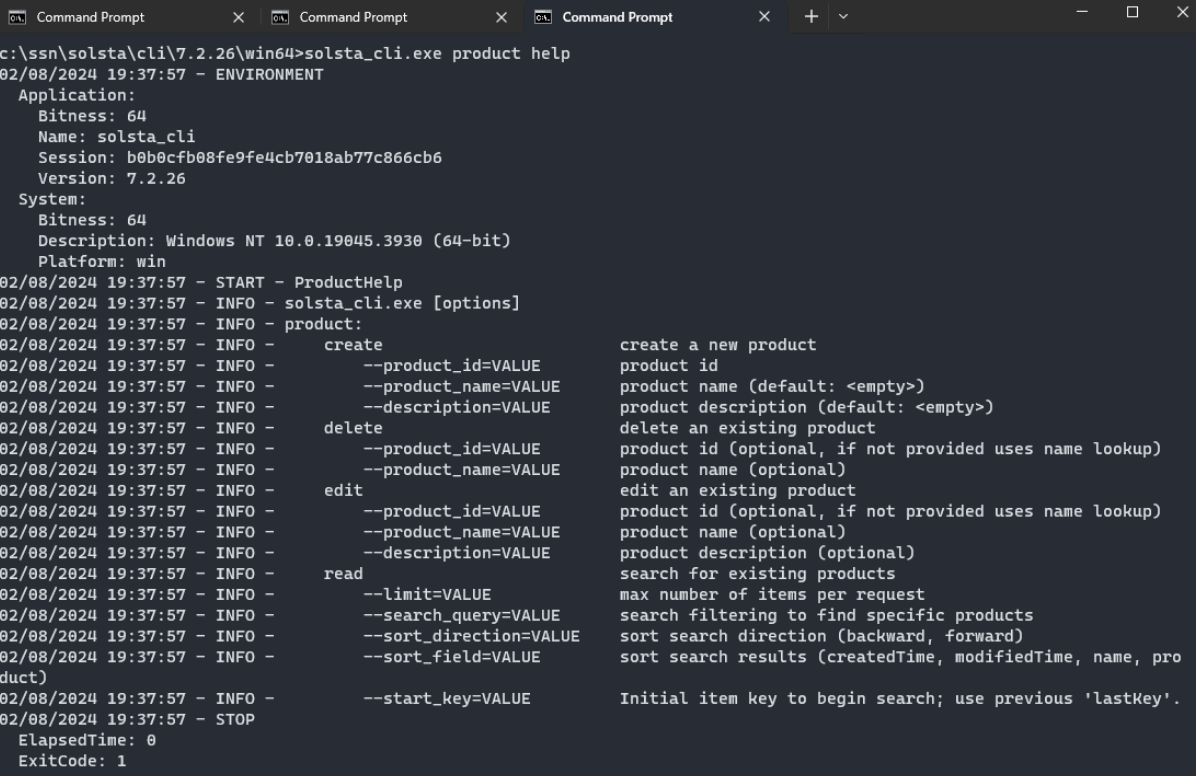
Sample help output - exit code 1
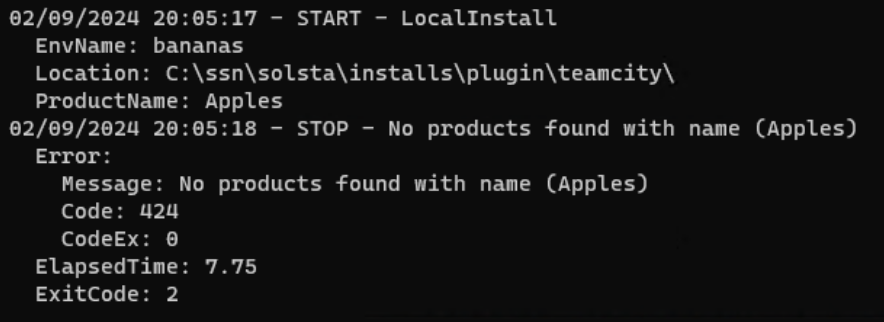
Sample error - exit code 2 and “error” section
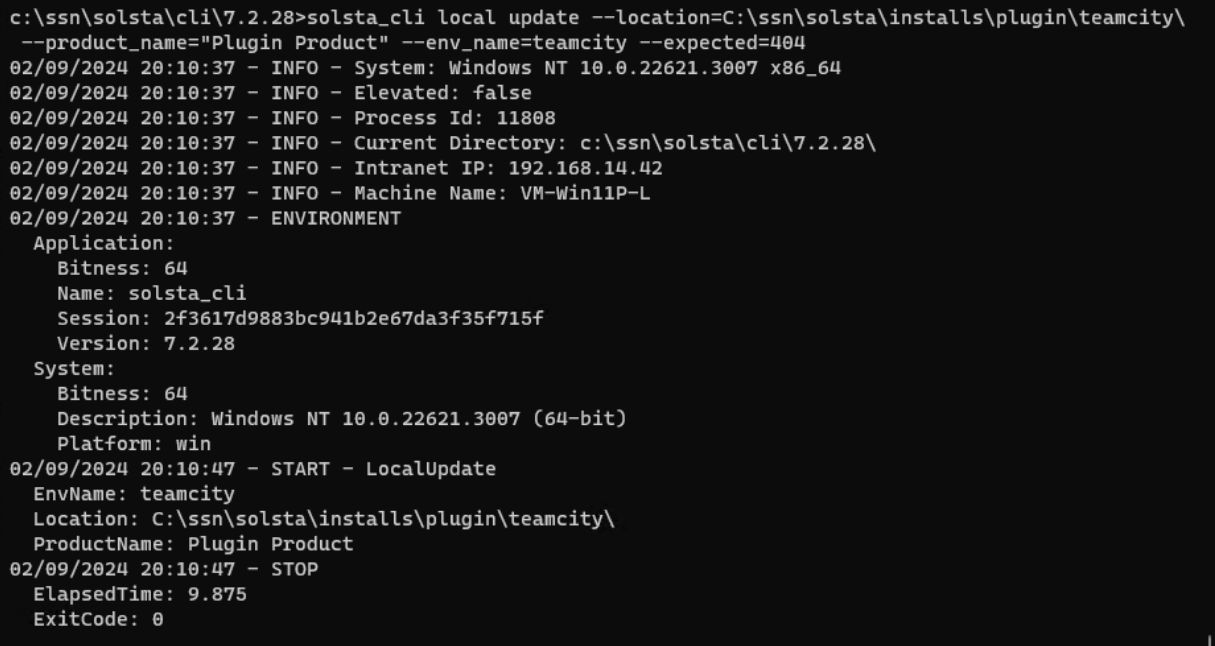
Sample expected error 404 - exit code 0
In the example below, there is nothing installed to the specified location. Normally it would result in an error with code 404, but the --expected parameter can be used to suppress the error and result in exit code 0.
solsta_cli local update --location=C:/ssn/solsta/installs/plugin/teamcity/ --product_name="Plugin Product" --env_name=teamcity --expected=404
Sample elevation required error - exit code 3
Solsta CLI and Solsta GUI
The Solsta CLI and Solsta GUI were designed to coexist on the same machine. The GUI can be used to visualize available products and environments or local installations as necessary, however, the GUI will NOT reflect updates performed by the CLI in real time. You must restart the GUI to refresh updates made by the CLI on the same machine under the same user credentials.
If you run the Solsta GUI and CLI simultaneously on the same machine and credentials, there is a rare but possible scenario in which the GUI can pick up operations from the orchestration service that were submitted by the CLI. This shouldn’t cause a problem as the desired operation will still be executed, but if you prefer to avoid this we recommend using the queue whenever possible to schedule updates outside of times the GUI is running.
What is Solsta CLI?
The Solsta CLI is a command-line tool for game studios that lets build engineers install, update, roll back, and manage game build environments without the desktop GUI. It integrates directly into CI/CD pipelines — Jenkins, TeamCity, GitHub Actions — and supports Windows, macOS, and Ubuntu. Use it to automate build distribution across your studio, manage concurrent installs via the orchestration queue, and deploy specific repository versions or snapshots to any environment.